Sunday, 21 February 2021

VVDI Key Tool Plus Function Released: Remote Online-cloud Recognition

Xhorse VVDI Key Tool Plus Pad has released a new function recently: remote online-cloud recognition, which is quick & accurate for locksmith daily work.

2 Ways for Remote Online-Cloud Recognition

Power on VVDI Key Tool Plus Pad

1. Remote program >> Remote online-cloud recognition

vvdi-key-tool-plus-function-released-remote-online-cloud-recognition-1

vvdi-key-tool-plus-function-released-remote-online-cloud-recognition-2

2. Remote clone >> Remote online-cloud recognition 

vvdi-key-tool-plus-function-released-remote-online-cloud-recognition-3

vvdi-key-tool-plus-function-released-remote-online-cloud-recognition-4

How to recognize the remote?

1. Press “Start” on Key Tool Plus Pad.

2. Press or release LOCK button on remote key according to prompts.

vvdi-key-tool-plus-function-released-remote-online-cloud-recognition-5

Remote online-cloud recognizing, please wait...

The programming remote was obtained successfully.

Remote key was recognized automatically.

Remote information will be displayed.

vvdi-key-tool-plus-function-released-remote-online-cloud-recognition-6

vvdi-key-tool-plus-function-released-remote-online-cloud-recognition-7

Note: users may need to select the appropriate remote when recognizing multiple possible remotes.

Here taking a KIA remote as an example.

KIA >> All remote >> NYODD4TX1306-TFL(SL13MY)

vvdi-key-tool-plus-function-released-remote-online-cloud-recognition-8

vvdi-key-tool-plus-function-released-remote-online-cloud-recognition-9

vvdi-key-tool-plus-function-released-remote-online-cloud-recognition-10

To have a check, press the image.

vvdi-key-tool-plus-function-released-remote-online-cloud-recognition-11

Full operation reference:


More information about VVDI Key Tool Plus to be updated...

https://www.obd2shop.co.uk/


Friday, 19 February 2021

Xhorse Dolphin XP005 Cut a Key for 2018 Subaru Outback

How to use Xhorse Dolphin XP005 machine to cut a key for the 2018 Subaru Outback? This post will show the procedure in detail.

This is a Subaru valet key used to duplicate a new key, it does have all 10 cuts on it. This remote head key is the new key to be cut.

xhorse-dolphin-xp005-cut-a-key-for-2018-subaru-outback-1

xhorse-dolphin-xp005-cut-a-key-for-2018-subaru-outback-2

Open Xhorse app on a smart phone, 

Vehicle database >> Subaru >> All key blank >> TOY43R >> Read the notes, press “OK”

xhorse-dolphin-xp005-cut-a-key-for-2018-subaru-outback-3

xhorse-dolphin-xp005-cut-a-key-for-2018-subaru-outback-4

xhorse-dolphin-xp005-cut-a-key-for-2018-subaru-outback-5

xhorse-dolphin-xp005-cut-a-key-for-2018-subaru-outback-6

Install the valet key on Dolphin XP005 clamp, fix it flat, tip align position 4.

Go back to Xhorse app: Decode key >> Continue

Dolphin XP005 machine starts decoding the key...

xhorse-dolphin-xp005-cut-a-key-for-2018-subaru-outback-7

xhorse-dolphin-xp005-cut-a-key-for-2018-subaru-outback-8

xhorse-dolphin-xp005-cut-a-key-for-2018-subaru-outback-9

When the machine stops and says key learning success, press “OK”, then remove the valet key from clamp.

Install the new key to be cut on clamp, fix it and make sure it is flat, tip align position 4.

Go back to Xhorse app: Cutting key >> Cut

Dolphin XP005 starts cutting the key...

xhorse-dolphin-xp005-cut-a-key-for-2018-subaru-outback-10

xhorse-dolphin-xp005-cut-a-key-for-2018-subaru-outback-11

xhorse-dolphin-xp005-cut-a-key-for-2018-subaru-outback-12

xhorse-dolphin-xp005-cut-a-key-for-2018-subaru-outback-13

When the machine stops, it means cutting completed!

So let’s make sure if the new key works, all right good that way, key cutting has done!

xhorse-dolphin-xp005-cut-a-key-for-2018-subaru-outback-14

I’ve got a perfectly duplicated Subaru key here that was cut by Dolphin XP005 Key Cutting Machine.

https://www.obd2shop.co.uk/


Friday, 29 January 2021

VVDI Key Tool Plus Hyundai Grand I10 Remote Programming & Matching

This article is available with the guide of Grand I10 remote programming & matching with Xhorse VVDI Key Tool Plus Pad.

Main steps:

1. Put the chip into VVDI Key Tool Plus and click “Generate Transponder”>>“ID 47”>> “New 7938 chip”>> “Generate”>>“Complete”.

vvdi-key-tool-plus-grand-i10-remote-programming-matching-01

vvdi-key-tool-plus-grand-i10-remote-programming-matching-02

vvdi-key-tool-plus-grand-i10-remote-programming-matching-03

vvdi-key-tool-plus-grand-i10-remote-programming-matching-04

2. Remove the chip from VVDI Key Tool Plus.

3. Click “Remote Program”>>“Hyundai”>> “Grand I10”>> “Grand I10 ID 47 1970”.

vvdi-key-tool-plus-grand-i10-remote-programming-matching-05

vvdi-key-tool-plus-grand-i10-remote-programming-matching-06

vvdi-key-tool-plus-grand-i10-remote-programming-matching-07

4. Connect VVDI Key Tool Plus with the remote and click “Generate”.

vvdi-key-tool-plus-grand-i10-remote-programming-matching-08

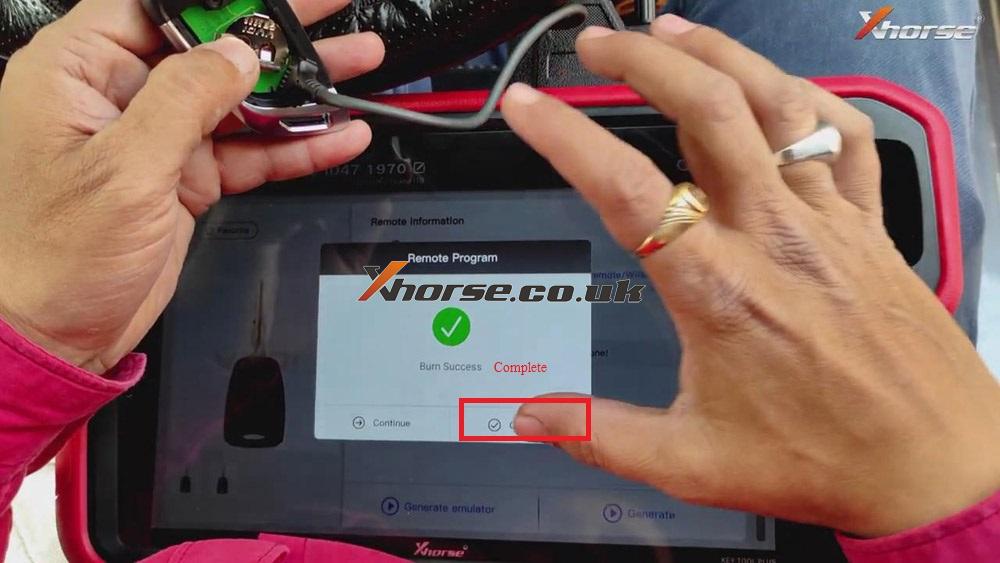
5. When burning is successful, click “Complete”.

vvdi-key-tool-plus-grand-i10-remote-programming-matching-09

6. Return to the homepage and click “Immo Programming”>>“Hyundai”>>“Read PIN code”>>“ID 46”>>“Begin”.

vvdi-key-tool-plus-grand-i10-remote-programming-matching-10

vvdi-key-tool-plus-grand-i10-remote-programming-matching-11

vvdi-key-tool-plus-grand-i10-remote-programming-matching-12

7. Turn on the ignition switch and click “OK”.

8. When the screen shows the password, click “OK”.

vvdi-key-tool-plus-grand-i10-remote-programming-matching-13

9. Click “No” to refuse to continue to test the password read currently.

vvdi-key-tool-plus-grand-i10-remote-programming-matching-14

10. When the operation is completed, click “OK”.

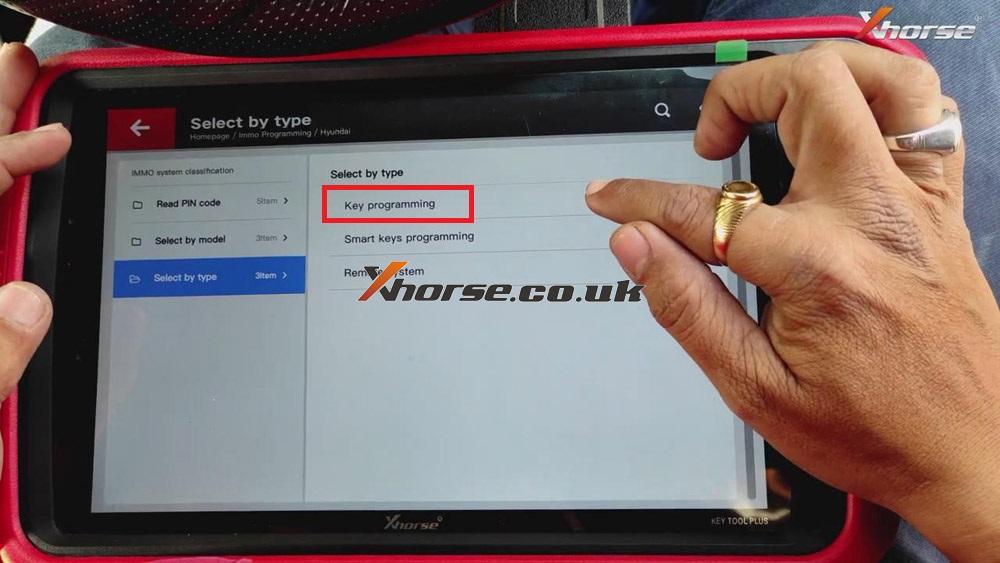
11. Click “Select by type”>>“Key programming”>>“Type4(CAN)”>>“Begin”>>“Key programming”.

vvdi-key-tool-plus-grand-i10-remote-programming-matching-15

vvdi-key-tool-plus-grand-i10-remote-programming-matching-16

vvdi-key-tool-plus-grand-i10-remote-programming-matching-17

vvdi-key-tool-plus-grand-i10-remote-programming-matching-18

12. Please switch the ignition off, then switch the ignition to ON again, or click the double flash button once to make sure the system is activated, then click “OK”.

13. When the screen shows the number of learned keys, click “Yes” to continue.

vvdi-key-tool-plus-grand-i10-remote-programming-matching-19

14. Input the password and click “OK”.

15. Click “Yes” to learn the 1 key.

vvdi-key-tool-plus-grand-i10-remote-programming-matching-20

16. Insert the wanted programming key and switch ignition to ON, then click “OK”.

17. When 1 key learning is successful, click “OK”.

vvdi-key-tool-plus-grand-i10-remote-programming-matching-21

18. When the screen shows whether to learn the 2 key, click “Yes”.

19. Insert the wanted programming key and switch ignition to ON, then click “OK”.

20. When 2 key learning is successful, click “OK”.

21. When the screen shows whether to learn the 3 key, click “No”.

22. When the screen shows cancel the learning of the 3 key, click “OK”.

23. When the screen shows operation is completed, click “OK”.

24. Return to the homepage and click “Immo programming”>>“Hyundai”>>“Select by type”>>“Remote system”>>“16 PIN”>>“Type2”>>“Begin”>>“Remote Key Adaptation”.

vvdi-key-tool-plus-grand-i10-remote-programming-matching-22

vvdi-key-tool-plus-grand-i10-remote-programming-matching-23

vvdi-key-tool-plus-grand-i10-remote-programming-matching-24

25. Please choose OBDⅡ interface and turn on the ignition switch to ON, then click “OK”.

26. Switch ignition off, remove the key, click “OK” to continue.

27. Press UNLOCK and LOCK button for more than 1 second.

28. When matching 1 remote is successful, click “OK” to match the next one.

vvdi-key-tool-plus-grand-i10-remote-programming-matching-25

29. Press UNLOCK and LOCK button for more than 1 second.

30. When matching 2 remotes is successful, click “Cancel” to refuse to match the next one.

31. When remote matching is successful, click “OK”.

vvdi-key-tool-plus-grand-i10-remote-programming-matching-26

Done!

http://blog.xhorse.co.uk/vvdi-key-tool-plus-hyundai-grand-i10-remote-programming-matching/